


Cuba has been on my “must see before I die" list for about ten years now. Something about the impossibility of it made it more appealing to me. I wanted to experience a country that wasn't dominated by consumerism, a place where new trends rarely reached, and most of all, I wanted to experience what it meant to live a Cuban life. And now, since Obama took a trip to start mending the not-so-stable relations between both countries, I knew it was my last chance to visit before McDonalds and Starbucks began plopping their consumerist claws on the island. But wasn't that everyone's thoughts in the summer of 2016?
In May 2016, I took a 20-day trip to do a little research, embedding myself as a Cuban look-alike with an American thought process. What I didn't know at the time, was that this trip would put my travel booking skills to the test. Of course, because I'm cheap and refuse to pay for a travel agent to book my trip from start to finish when I have a brain and Google at my fingertips.
Then I fell flat on my face when I learned that Cuba has extremely limited access to internet, creating a predicament for someone like me who likes to research details about a country before diving in head first.
Due to the lack of information available about Americans going to Cuba, I figured I would make a research trip out of it all to write this blog that I was needing all along. Here are all the things Americans need to know before going to Cuba.
Plan How You'll Book Your Ticket to Cuba
Six airlines were approved to fly direct flights from cities in the USA to Havana, but let's not disregard that you'll probably have to pay big bucks to get the comfort of a 45 minute trip from Miami.
I did it the old fashioned, cheap way, which meant a lot of risk taking and hitting up Mexico before heading on to Cuba. I found my flight on Skyscanner from LAX to MEX – the largest airport I've ever seen, and from there booked a flight to Havana. The entire trip time was about 10 hours with a four-hour layover, and cost me no more than $750 round-trip. On the way back, I booked from Havana to Cancun, and Cancun back to the USA. I've heard Cancun's airport is significantly better to enter Cuba, because unlike Mexico City, you won't feel like you forgot the memo to pack your track pants and running shoes.
Buy International Health Insurance
Again, this information wasn't BOLD or outlined anywhere, but while I was researching, I came across a few articles that stated all foreign travelers booking a trip to Cuba must have international health insurance to enter the country. Imma be real; I've never bought travel insurance or international health insurance before, which is probably careless.
Whoops.
After closing several tabs that quoted about $200 for unnecessary insurance policies, I came across the company Roam Right that gave me basic insurance for a month of coverage for only $15. The bonus with this was that they didn't only cover health incidents, the policy also had trip coverage listed and $300 of reimbursement if any luggage was lost, among other things that gave me more peace of mind when planning such a stressful trip.
I entered and left the country fine without having to show anyone my insurance policy, but it was still comforting to have spent the extra $15 for a tiny bit of ease.
Buy a Tourist Card
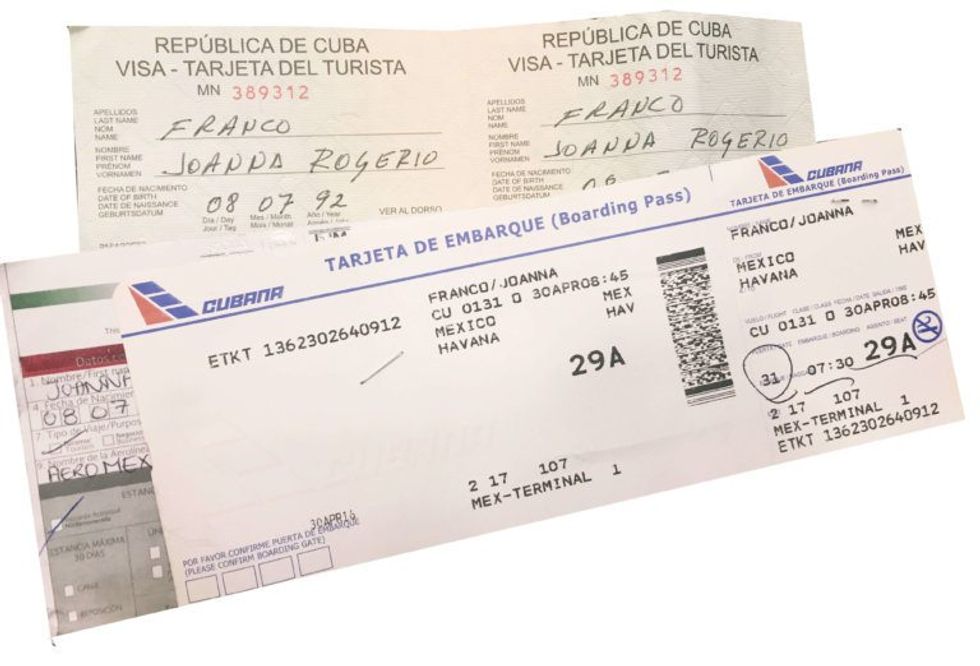 Wow, what can I say about this step? Months before I even took the trip, I found myself mumbling things in Spanish over the phone to the Cuban embassy in the USA, and to the workers of the Mexico City airport all in an effort to get the answers I needed.
I've taken trips abroad in which you need to go to the country's embassy ahead of time and pay to apply for a visa, and anxiously await a response. I've also gone to other countries like Egypt, where you simply get off the plane and buy a visa when you're already in the country.
Cuba uses neither of the two systems that I've experienced, and it seemed like no one could explain how I could get a freaking visa/tourist card to go to Cuba before getting to the airport.
What You Need to Know Before You Travel to Cuba
Some flight and tour companies sell you the tourist card with your flight – make sure that it's included if you're buying a direct flight from the USA to Cuba. Since I was a cheapo, clearly that wasn't my case.
If you book with a travel agent, they'll most likely handle this for you as well.
OR if you're going the old school way, you'll need to buy it right next to the check-in counter of the Mexico City airport. There will be a tiny podium with some janky signs posted about fine print policies – don't expect an easy “BUY TOURIST CARD HERE" sign, because that'd be way too easy. There will most likely be an airport worker taking passports and scribbling on pieces of paper. That's exactly where you need to go to ask about your “tourist card." After you find the podium, it's all simple and straightforward (finally, jeez). You pay $25 USD for a visa that lets you stay in Cuba for 30 days. You have the option to renew for an additional 30 days once in Cuba.
Prepare To Have Limited To No Connection
As of now, there's absolutely no way to get cell phone service with American telecom companies in Cuba. Don't even bother buying international texting or some sort of “global" cell phone plan, because it won't work. You will also experience the least amount of WiFi you've ever experienced; which is great in the long run. It's one of the few places left in the world where you can actually enjoy your time in the country without posting about it every two minutes.
In order to plan for this lack of connectivity, download all the entertainment you'll want for your duration abroad. Take screenshots of your flight bookings and documents as back up. Write down important addresses you'll need when you arrive in Cuba. Become best friends with a notebook and pen. And lastly, notify your family that you'll truly have limited connection when you arrive. If they're worried, give them your flight information so they can check when you land in Cuba.
Once you're settled, you'll be able to pay $2-$10 for Nauta WiFi cards that will give you one to five hours worth of internet that can only be accessed in public parks (nothing beats tweeting and sweating), on random corners, and inside hotels. If you see a group of people standing around outside, it's because they're updating their Facebook statuses.

You'll be able to buy the best cards at an actual ETECSA Telepunto store (where Cubans go to buy their phone minutes and internet cards), or go to any public park and buy a slightly over priced “tarjeta" from guys sketchily selling them on the street.
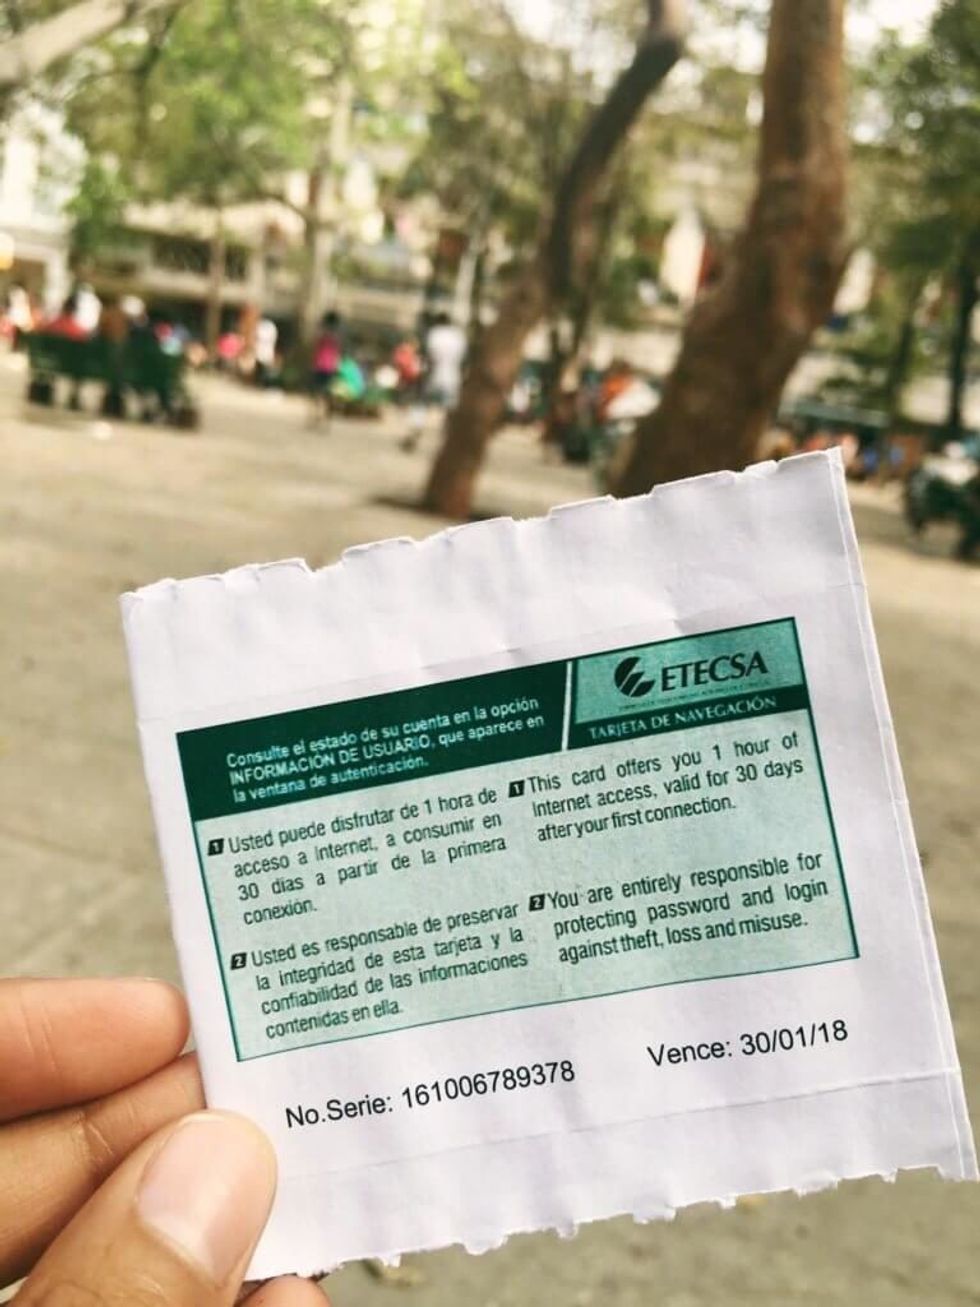

Try to get as close to these prices as possible:
1 hour – $2CUC
5 hours $10CUC
Accommodation: Booking a Casa Particular

Since Cuba is pretty new to the tourist game, options for accommodations are a little bit different. There are basically no hostels and pretty few luxury hotels, that I clearly won't be staying in.
The only other option is staying in a Casa Particular. Think of a Casa Particular of a temporary homestay, almost like an Airbnb (which also exists in Cuba, with a twist, see below). Here's the basic idea behind a “Casa Particular": if Cubans have extra rooms in their homes that they'd like to rent, or entirely vacant apartments, they'll put a sign on their door with the iconic blue anchor to show their vacancy and that they're a legal Casa. Sidenote: blue signs are for tourists, red signs are for Cubans only.

I found my first Casa through a friend, it was on the pricier end of the spectrum ($45/night for two people) for a private apartment with a balcony facing the Malecón and the ocean. It was definitely worth every dollar, if you'd like this casa's contact information, email me: jo@damonandjo.com with subject line “Casa in Cuba."
Casas can be as cheap as $15/night for up to two people, but cheap rooms usually don't have windows, which is a personal deal breaker; traveling ain't so good when you can't see anything.
Most Casas have the same amenities as you would a hotel; usually private bathroom, clean towels, sheets, etc, don't count on ever having WiFi though!
Also, it's important to know that you can book listings on Airbnb.com only BEFORE getting to Cuba. Once in Cuba, you'll be blocked from actually booking rooms through the site. Book your accommodation in advance to avoid the stress of knocking on doors like I had to once my accommodation ran out.
Prepare Your Money
 While joining the dozens of gringos waiting in line to exchange money at a Cadeca, or a “Casa de Cambio (House of Exchange), I overheard some Americans behind me speaking to a local, who was clearly trying to scam them for an inflated exchange rate.
What they didn't know, like most other Americans, is that while relations between the US and Cuba is slowly getting better, there are still fees for using the USD.
Any Cadeca will charge a 10% commission fee for converting USD into CUC, or Cuban Convertible dollars, aka “Tourist Currency," not to be confused with the CUP, or “Moneda Nacional" for the locals. The smart technique is to exchange Euros in advance and use that to exchange into local currencies while abroad.
Here's some info to give you an idea:
This is CUC or tourist money:

Any bill with a face on it is Moneda Nacional, or CUP mostly used by locals:

$1 USD should = $1 CUC, but costs $.87 after the commission is taken out
$1 CUC = $24 CUP
Oh, and the most important part about planning your finances is that you CANNOT withdraw money from any ATM in Cuba, nor can you use any of your credit cards, so you need to bring enough cash money to last the entirety of your trip.
For more information on money tips: https://www.visitcuba.com/travel-guide/travel-tips/
Prep Your Tummy

To put it simply, cuisine in Cuba is an overall pretty crappy experience because of their many years of isolation, and the fact that all rich restaurant owners fled to different countries when the revolution wiped out the rich (hospitality savvy) class. Aside from the political reasons that cultivates crummy food, the water quality produces limp fruits and veggies. I swore I ate a watermelon that was so dry it had the texture of a cookie. Be sure you understand that this will not be the best culinary experience of your life. Privately-owned restaurants are still learning how to cater to the Western world's standard of service. Here are tips to survive the stomach pains:
Beware of the Water
Water in Cuba might will give your stomach a poopy time, literally. Some good advice would be to pack enough probiotics to last your entire trip, and to take a few days before you even leave. Bring Immodium AD and Pepto Bismol for if and when things get bad; these medications are nearly impossible to find there. While Cubans are immune to the terrible water, tourists will not withstand its wrath. Even if you're not chugging glasses of tap water, you'll most likely drink a mojito with ice cubes made from tap water – watch yourself.
Bring Snacks
My first few days, I was craving chocolate like never before. It seemed like there were no stores that sold cookies, chocolate, or anything in general, because there were barely any stores. At this point in time, Cuba is the furthest thing from having a consumerist culture, things are extremely difficult to get, stock, sell, and buy.
The few grocery stores that there are sometimes require you to wait in four lines; one to check your bag, another line to get inside of the store, another to order basic things from behind the counter (i.e. hair products, cookies, basically anything that you'll really need), and another line to check out. It's a struggle, so I suggest you bring extra snacks that you know you'll miss to avoid major chocolate withdrawals like I did.
Going out to Eat

You might see windows on the street, or “cafeterias" selling pizza, spaghetti, or simple sandwiches, which I've eaten in, and never had any major problems. If you have a sensitive stomach, you might want to stay away from “street meat." You'll also see Paladares, which are privately-owned restaurants inside locals' homes. The name comes from a Brazilian novella about a poor woman turned millionaire after opening her own small restaurant in her home called “Paladar."
The service in these privately-owned restaurants is usually way better than at government-owned restaurants, which make you feel like your middle school cafeteria, served at five star standards. How do you know if it's a government-owned restaurant? If the servers all look the same and greet you with a less than impressed gaze or boredom, you're at a government-owned restaurant.
Pack Extra Clothes and Toiletries
This one is the opposite of advice I'd normally give for long trips, but here's why you need to pack a little extra to go to Cuba. Most Cubans have challenges affording basic things like hygiene products, clothes, shoes, etc. There is also a shortage of things like paper goods; paper plates, paper towels, toilet paper, etc. Things that we take for granted every single day in The States is a reason to celebrate in Cuba. When the average salary of a Cuban is equivalent to $20 USD a month, there's no way every Cuban can achieve a standard of living beyond simply surviving.
You'll notice that the airport check-in for baggage to Havana will be bigger than any you'll ever see; family members returning to home will bring back massive flat screen TVs and duffle bags filled with lotions, Ziplock bags, and clothes.
Even if you're a backpacker, you can probably pack a few extra shirts that you've only worn once, that will make all the difference to a Cuban.
On our first day, we met a Cuban man named Frank who passed the sketch-o-meter test. All he asked was for clothes he could give to his sisters in exchange for local information. Fast forward and we had a full day of Havana sightseeing and paid him back in four tank tops and shorts that I've worn in videos 324908 times that I didn't really need.
And Lastly…
And so, while Cuba is still difficult to get to as an American, I can confidently say that it's been one of the most gratifying, profound, and eye-opening trips I've taken. I highly recommend you experience it all for yourself through a local lens. Be prepared to strip yourself out of your comfort zone, put your gadgets and gizmos away, and get lost in time for the very first time.
Is Cuba on your travel bucket list? What places are you trying to travel to before you die? Let us know in the comments below!
*Article Originally Published On Shut Up And Go
Damon and Jo are two travel YouTubers who are changing the face of the travel industry with a backpack, multiple languages under their belt, and only a few dollars to their name. Check out their travel and day-to-day adventures by subscribing to their YouTube channel and by keeping up with their Shut Up And Go travel blog.
RELATED


Anyway, I personally think that the less shallow folks out here may contemplate calling things “quits” or they at least distance themselves a bit from their partner (and what I’m referring to is serious relationships) due to all of the stress and strain that oftentimes comes with the holidays whether it be financial, familial, due to their tight schedules or something else.
Listen, I would hate for you and your man to miss the fun and happiness of experiencing this time of year, all because you are so overwhelmed or irritated that you can’t really enjoy it. That’s why I have a few practical tips for how to avoid allowing the typical holiday season stress from INFECTING your relationship.
Manage Your Expectations
 Giphy
GiphyUnmanaged expectations. If there is a main reason why the holiday season tends to be so stress-filled for so many people, I’d bet good money that this is the cause. And when you’re in a long-term relationship, expectations can manifest themselves in all sorts of cryptic and/or unexpected ways. You might have relatives who assume that you are going to be with them for Thanksgiving or Christmas when you have other plans in mind. You might be thinking that you are going to spend one amount for presents while your man is thinking something totally different. When it comes to scheduling, your signals may be crossed.
And you know what? To all of these scenarios, this is where clear and consistent communication come in. Don’t assume anything. Don’t dictate anything either. From now until New Year’s, mutually decide to check in once a week, just to make sure that you are both on the same page as it relates to the holidays and what you both are thinking will come along with it. The less blindsided you both feel, the less stressed out you will be. Trust me on this.
Set (and Keep) a Budget
 Giphy
GiphyOkay, so I read that last year, 36 percent of Americans incurred some type of holiday-related debt. Hmph. Last year, there was still some sense of normalcy in this country, chile, so I can only imagine what finances are gonna look like over the next several weeks. That said, since I don’t know a lot of people who don’t find being broke stressful, make sure that you and your bae set a budget and then stick to it this year — no ifs, ands or buts.
Because really, y’all — it doesn’t make sense to deplete savings and/or max out credit cards for a few days of giggles only to be damn near losing your mind because you don’t know how to make ends meet come Dr. Martin Luther King, Jr. Day.
And by the way, this tip doesn’t just speak to things like food and gifts; I also mean travel. If it doesn’t make a ton of sense (or cents) to be all over the place this year — DON’T BE.
Keep Matthew 5:37 at the Forefront
 Giphy
GiphyIf off the top of your head, you don’t know what Matthew 5:37 says, no worries, here ya go: “But let your ‘Yes’ be ‘Yes,’ and your ‘No,’ ‘No.’ For whatever is more than these is from the evil one.” That verse right there? Oh, it’s a boundaries lifesaver! I say that because do you see “maybe” or “I’ll think about it” in there? Nope. LOL. It says that you should tell people “yes” or “no” and leave it at that — and that complements Anne Lamott’s quote, “’No’ is a complete sentence” impeccably well. Yeah, you’ve got to remember that anything beyond a yes or no to a request is privileged information; you don’t owe anyone details or an explanation.
Besides, if you are really honest with yourself, when someone asks you something and you give a “Umm, let me think about it” kind of reply, more times than not, you already know what your answer is going to be — so why not let you both off of the hook? Give your response. Commit to that. And let everyone (including yourself) get on with their lives and schedules.
I promise you that when it comes to those holiday parties, you are pissing more folks off by not RSVP’ing or doing so and not showing up than just saying, “Thank you but not this year” off the rip.
Remember That Your Personal Space Is Privilege Not a Right
 Giphy
GiphyA friend of mine recently bought a new house and invited me over to come see it. He’s a single man with no children, so as I was taking in all of the space that he had, especially as I walked through his finished basement, I joked about relatives coming to live with him. “Hell no” and “absolutely not” were pretty much his immediate responses as he went on to say that some folks even had the nerve to be offended when he told them that he had no intentions on taking DNA in.
Ain’t it wild how people think that your stuff is their right? And yes, that brings me to my next point. Your home is your sanctuary space. If you want to host folks this year — cool. If not, ALSO COOL. Please don’t let folks (family included) guilt you into how they want you to act or even into what they would do if the shoe was on the other foot. You are not them — and as one of my favorite quotes states, “If two people were exactly alike, one of them would be unnecessary.” (A man by the name Larry Dixon said that.)
Hell, my friends? They know that I am good for sending them random things that they need or even want all throughout the year. Coming over to hang out at my pace, though. Uh-uh. Chalk it up to being a card-carrying member of the ambivert club yet I like keeping my living space personal — and I sleep like a baby, each and every night, for feeling that way.
Always remember that your space, your time, your resources, your energy and shoot, yourself period (including your relationship), are all things that are your own. You get to choose how, when and why you want to share them. The holiday season is certainly no exception.
Cultivate Some “You Two Only” Traditions
 Giphy
GiphyIt’s not uncommon for some couples to hit me up after the holiday season to “detox.” Sometimes it’s due to the financial drama (and sometimes trauma) that they experienced. Sometimes it’s because they allowed their relatives (especially in-laws) to get more into their personal business than they should’ve. More than anything, though, it tends to be because they didn’t get enough quality time together and so ended up feeling “disconnected.”
Please don’t let that happen. Listen, I’m not even a holidays kind of woman and yet, I will absolutely sit myself down with some hot chocolate and chocolate chip cookies to enjoy a Hallmark holiday film or two. Aside from the fact that most of them are lighthearted and sweet, I also like that they usually focus on couples loving on each other amidst all of the holiday beauty and ambiance — which is something that all couples should set aside some time to do.
Maybe it’s a vacation. Maybe it’s a staycation. Or maybe it’s my personal favorite, A SEXCATION. Whether it’s for a few days, the weekend or even overnight — don’t you let the holidays go by without setting aside time for you and your man to celebrate one another. Don’t you dare (check out “Are You Ready To Have Some Very Merry 'Christmas Sex'?”).
GET. SOME. REST.
 Giphy
GiphyI once read that 8 out of 10 people get stressed out over the holidays and 3 out of 10 lose sleep during to it — and when you’re stress-filled and sleep-deprived, that can absolutely lead to hypersensitivity, making mountains out of molehills and even not being in the mood for sex.
Your relationship can’t afford to go through any of this, so definitely make sure to prioritize rest. I don’t care how unrealistic it might seem during this time, sleep should never be seen as a luxury; it will always and forever be a great necessity.
That said, try to get no less than six hours of shut-eye in (check out “6 Fascinating Ways Sex And Sleep Definitely Go Hand In Hand”) and even ask your bae to take a nap with you sometimes (check out “Wanna Have Some Next-Level Sex? Take A Nap, Sis.”). Not only will sleep help to restore your mind, body and spirit but, when it’s with your partner, it’s an act of intimacy that can make you both feel super connected, even in the midst of what might feel like chaos.
___
Holiday season stress is real. Still, never give it the permission or power to throw your relationship off. Put you and your man first and let the holidays be what they are gonna be, chile.
Let’s make things inbox official! Sign up for the xoNecole newsletter for love, wellness, career, and exclusive content delivered straight to your inbox.
Featured image by Shutterstock

And that is why I decided to put emphasis on the word “late” for today’s topic. Because if you and someone break up and they approach you, well after the fact, with an “I’m sorry,” if you struggle with whether or not to accept it due to the timing of it all, you should definitely ponder that a bit.
And as you’re doing so, it might help to read a bit deeper into what an apology should look and live like, even from an ex, regardless of when it shows up.
Your “late.” Or his right on time.
Three Things That a True Apology Consists Of
 Giphy
GiphyIt’s kind of wild that when you work as a therapist/counselor/coach, a lot of people never really see you as human — and this can include your close relationships. What I mean by that is, it’s almost like they expect you to be free on-call therapy to the point where they “forget” to actually check on you sometimes.
Such is the case with one of my longest-running friendships. Even during the weeks between losing my mother and losing $4K (SMDH), she would just keep calling me to vent about her marriage. I finally got so fed up that I brought it to her attention that for the past couple of years, that is exactly what our friendship has been like: her venting, me listening without her being very invested in my life at all. In response, she texted me an apology — and boy, was it beautiful.
I’m not going to share the details of what she said; however, I am going to tell you three things that it consisted of because it’s what I believe ALL APOLOGIES should entail.
1. She took full ownership for what she believed that she did. I framed this point in this way because, something that everyone needs to forever keep in mind is the fact that two people start and, to a large extent, end relationships — and what I mean by that is, it’s never like one person was perfect and the other was the villain. That said, though, when someone is making an apology to another individual, they are going to own their part and articulate what that part is. It’s not gonna be a simple “My bad.”
It’s going to be “I am really sorry that I wasn’t there for you when you needed me” or “I apologize for taking you for granted” — something that sounds like they get the “offense” that transpired. By doing this, they recognize their missteps — and that is what puts people on the road to not repeating them.
2. She did not deflect or gaslight me. You know what one of the worst apologies are: It’s when someone says they are sorry and then follows it up with, “But you do it too” or “If you hadn’t done ‘A’, I wouldn’t have done ‘B.'” Justifying your actions is a surefire way to make someone believe that you don’t really think that you did something wrong (or that bad) in the first place. And really, how can they trust you (again) if that is how you feel? Oh, and don’t get me on gaslighting.
Ugh, ain’t nothing like someone claiming that they want to set things right with you, only to act like they don’t really get where you are coming from with the issues y’all were having in the first place. A good gaslight line in an apology: “If that is what you think happened, I apologize.” Yeah, you can keep that, jack. Never accept this kind of apology — because it isn’t one.
3. She addressed why she needed to make the apology in the first place. Wanna know one of the main reasons why I don’t trust people who don’t believe in having regrets (check out “Why Regret Might Not Always Be A Bad Thing”)? Did you know that apology means “a written or spoken expression of one's regret, remorse, or sorrow for having insulted, failed, injured, or wronged another.” How, as a human, do you think that you are out here not making any mistakes or poor decisions that you sometimes need to APOLOGIZE for? That is just…insane.
And one of the reasons why apologies are important is because if you feel bad about “failing” someone, it’s usually because you value them enough to want to keep them around. And yes, in my friend’s apology, she also explained why she didn’t want me to feel hurt in the way that she had hurt my feelings and what she would do to prevent that from happening in the first place.
So y’all, with all of this out of the way, before getting deeper into this topic? If an ex is hitting you up to apologize to you for something, please make sure that he hits all three marks of a true apology.
Now let’s keep going.
A Genuine Apology Should Also Include an Amends
 Giphy
GiphyA few years ago, I wrote an article for the platform entitled, “Heads Up: It's NOT An Apology If An Amends Isn't Made.” You know how I mentioned a second ago that a solid apology has no gaslighting in it? Hmph. Ain’t it wild how someone can do something that hurts or harms you and yet, they want you to just “hurry up and get over it”? GASLIGHTING.
Someone in my family, after unpacking years of abuse that I experienced at their hand, they had the nerve to say, “I’m not going to keep apologizing to you for this.” Hmm…Okay. So, how about you let me give you a consistent three months’ worth of the years of mistreatment that I experienced from you and then flippantly throw an apology your way. Let’s see how you feel about it. How much you believe that I am being genuine and sincere.
Listen — and please hear me GOOD on this: when someone really gets the magnitude of the pain or discomfort and inconvenience that they caused, they aren’t going to be fine with just saying that they are sorry for it; they are going to ask you what they can do to set things right.
It’s actually a part of the reason why I named the four children who I aborted (check out “Why I Named The Children I Aborted”) because I do have some real remorse for those decisions. Each of their names have an intentional meaning and I strive to leave out their purpose, through those names, on a daily basis. It’s a small way of making amends.
You know, back when my first book came out, my first love reached out, via email, to send me an apology. The apology hit most of the points that I mentioned earlier. Looking back, there wasn’t an offer to make an amends, though, and trust me, there was A LOT to make up for.
At the end of the day, amends means “reparation or compensation for a loss, damage, or injury of any kind; recompense” and while none of us should use bitterness, resentment or emotional stagnation as the “bar” for which we should expect amends to be made, if you’re trying to figure out just how sincere an ex is with their apology, if they want to do something to make things better, that’s a good sign.
There is a caveat, though.
Discern the Motives. Always.
 Giphy
GiphyEarlier this summer, I wrote an article for the platform entitled, “What's Your Motive For Sex? (It Reveals A Lot. Trust Me.)” Then, a few weeks ago, I wrote another article entitled, “As Cuffing Season Steadily Approaches, What The Heck Is 'Winter Coating'?” and boy, when I tell you that both of these complement this point really well? Goodness.
If you’ve never heard of the dating trend known as winter coating before, it’s basically when an ex creeps back up around cuffing season — and if you know what cuffing season is all about, you can absolutely connect the very probable motives behind those dots.
Now can there be exceptions? There are ALWAYS exceptions. Still, if you haven’t heard from your ex in years and here he comes a couple of weeks before Christmas, unless the two of you got together or broke up around the holidays, stay on potential “winter coating alert,” because it might not be about “building bridges” so much as getting into your bedroom.
That said, if it’s been a minute (six months or more) since you’ve heard from an ex and he suddenly reaches out to apologize, absolutely take out a moment to discern the motive — and shoot, feel fine with even asking what is causing him to make the move…now. If it’s in the spirit of the holidays and wanting to go into a new year with a clean slate, got it. If it’s because he’s been in therapy and realizes that he didn’t end certain things in his past very well, understood. If it’s because he didn’t like how the two of you broke up and he wants to try and make peace, that’s fair.
On the other hand, if you sense that he wants to rekindle something (check out “Nelly And Ashanti Are Giving It Another Shot? Here's What You Should Know About 'Ex Reconciliation'” and “I'm Thrilled That Ryan Destiny & Keith Powers Are Back Together. 5 Things Before Reuniting With Your Ex, Tho.” and “What Happens When 'The One Who Got Away'...Comes Back?”) — although that’s kind of another article for another time, do check that motive.
When someone apologizes, you should really be the only focus for them; not what they can get out of it on the back end. Listen, even if he hopes to get back with you (or back in bed with you), that shouldn’t be something that is discussed during the apology. If it is said or even implied, something about HIS MOTIVE is disingenuous. And if that is indeed the case, to a valid extent, so is he.
We All Should Give the Grace and Mercy That We Desire
 Giphy
GiphySooner than later, I’m going to write an article about forgiveness (beyond what I already have here). For now I’ll just say that if you are someone who thinks that other people don’t deserve forgiveness? That is either your pain or your ego talking and, either way, you can’t trust “their” judgment.
All of us mess up sometimes and if you are a karma (or you reap what you sow) believer, then you absolutely should want to extend others grace and mercy so that you can receive it in your own time of need (and you are absolutely delusional if you think a time won’t come, sooner than you probably think, that you will need it).
Besides, do you know all of the self-inflicted drama and trauma that comes from NOT forgiving others: higher blood pressure, insomnia, stress, anxiety, the higher risk of a heart attack, a weakened immunity, a greater risk for depression and anxiety — whatever he did, is it really worth all of this? Yeah, while a lot of people think that weaponizing forgiveness is empowering, really all it’s doing is putting themselves in harm’s way. Physically. Emotionally. SPIRITUALLY: “For if you forgive men their trespasses, your heavenly Father will also forgive you. But if you do not forgive men their trespasses, neither will your Father forgive your trespasses." (Matthew 6:14-15 — NKJV)
By the way, no one is saying that forgiving that man means that you have to allow him back into your life. After all, access is a privilege. Yet if he comes to you and acknowledges that he feels sorry for some things, for the sake of your own sanity, why not let him express it? Don’t wanna meet up or talk on the phone? Understood. Email and/or text are there for the taking. Don’t want to go back and forth? Who said that it needs to be a discussion or a debate?
All I know is, the more time you spend on this planet, the more you want to put out the energy that you want to come back. Forgiving others tends to make life easier. Not forgiving? Oh, the way that it boomerangs, sometimes in ways you never saw coming, chile. Dodge that kind of experience (and typically hard life lesson) if you can.
Yes, Better Late than Never
 Giphy
GiphyToo late to apologize. Yeah, I don’t really know if there is such a thing (because forgiving and reconciling are not one in the same and some of y’all will catch that later). I’ll wrap this up with a story to prove my point.
Once upon a time, I knew a woman who was in a serious relationship and yet, whenever her boyfriend would bring up the possibility of marriage, she would stall him out. When I finally asked her what her deal was, she explained that she still harbored so much pain from the man before him that she didn’t fully trust that he was the real deal. About five months later, here came her ex with a thorough explanation for why he made some of the decisions that he did while they were together. Now that she had the full story, she was able to heal. She got married to her boyfriend that following year.
You see where I am going with this? Although your ex’s apology might be “late” as far as y’all’s relationship timeline, the timing may be BRILLIANT when it comes to true when and why you actually need it. Yeah, a Scripture that I adore is “Timing is the Father’s business” (Acts 1:7 — Message) and sometimes those apologies, in the grand scheme of things, are more on time than you could ever imagine; they’re when God deems you need them not when you want to have them.
____
It is Oprah Winfrey who once said, “True forgiveness is when you can say, "Thank you for that experience” and sis, if you remove the bitterness and anger and look deeper, there were valuable lessons, even in and from the most challenging relationships. And that is worth appreciating through forgiveness and, if need be, full and complete release.
Bottom line, should you accept an ex’s late apology? Absolutely.
What better way to illuminate your present on a whole ‘nother level.
Just as forgiveness always does.
TRUST ME.
Let’s make things inbox official! Sign up for the xoNecole newsletter for love, wellness, career, and exclusive content delivered straight to your inbox.
Featured image by Shutterstock